I loved this tissue box couch as soon saw it. I looked online for some examples and came across a few videos, but they were often confusing and long. I winged it after watching a few different things and here’s what I came up with.
For this couch you will need fabric, interfacing (I used Decor Bond), needle and thread, and polyester filling. And a tissue box!
Read on for instructions on how to make your own including a calculator to help you determine the cuts you need.
Cuts
For this project there are 3 primary cuts of fabric (top, sides, and back) plus the pillows.
First, measure your tissue box. In my case the box was 9” long (L) × 4.75” wide (W) × 3.5” high (H) so my calculated cuts were:
Fabric Piece | My box dimensions | Cut Equation | Cut Size |
|---|---|---|---|
Top (x2) | 9” (L) × 4.75” (W) | (L + 0.75”) × (W + 0.75”) | 9.75 × 5.5 |
Top Interfacing (x1) | 9” (L) × 4.75” (W) | L × W | 9” x 4.75” |
Couch Sides (x1) | 9” (L) × 4.75” (W) × 3.5” (H) | (2L + 2W) × (H + 1) | 28.5” x 4.5” |
Couch Back (x2) | 9” (L) × 4.75” (W) | (L + 2W + 0.75”) × (H - 0.25”) | 19.25” x 3.25” |
Pillows (optional) | Customizable | Based on desired size and shape | As Desired |
I tried to measure to the closest 0.25” going bigger if I needed to.
Cuts Calculator
Enter your tissue box dimensions below to calculate the fabric cuts you need.
Results
| Fabric Piece | Calculated Cut |
|---|---|
| Top (x2) | --- |
| Top Interfacing (x1) | --- |
| Couch Sides (x1) | --- |
| Couch Back (x2) | --- |
TOP OF THE COUCH (A)
The top fabric should be cut as a rectangle that is 0.75” wider and 0.75” longer than the top of your tissue box, so that the dimensions are (L + 0.75”) × (W + 0.75”).
For my tissue box that means I cut out fabric that was (9+0.75)” × (4.75+0.75)” or 9.75” × 5.5”. You will need 2 of these pieces. The second piece does not have to match—it will not be visible.
A piece of interfacing should be cut to match the size of the top of your tissue box.
SIDE OF THE COUCH (B)
The side fabric should be cut as a rectangle that wraps all the way around the tissue box, so that the dimensions are ((L × 2) + (W × 2) + 1.0”)) × (H + 1.0”).
For my tissue box that means I cut fabric that was ((9 × 2) + (4.75 × 2) + 1.0”)) × (3.5 + 1.0”) or 28.5” × 4.5”. You only need one of these pieces.
back/cushion OF THE COUCH
The back/cushion fabric should be cut as a rectangle that wraps around the sides and back, so that the dimensions are ((L) + (W × 2) + 0.5”)) × (H – 0.25”).
For my tissue box that means I cut fabric that was ((9) + (4.75 × 2) + 0.5”)) × (3.5 - 0.25”) or 19.25” × 3.25”. You will need 2 of these pieces.
FABRIC PREP
Center the interfacing on the wrong side of a top piece (piece you want to show) and iron it in place.
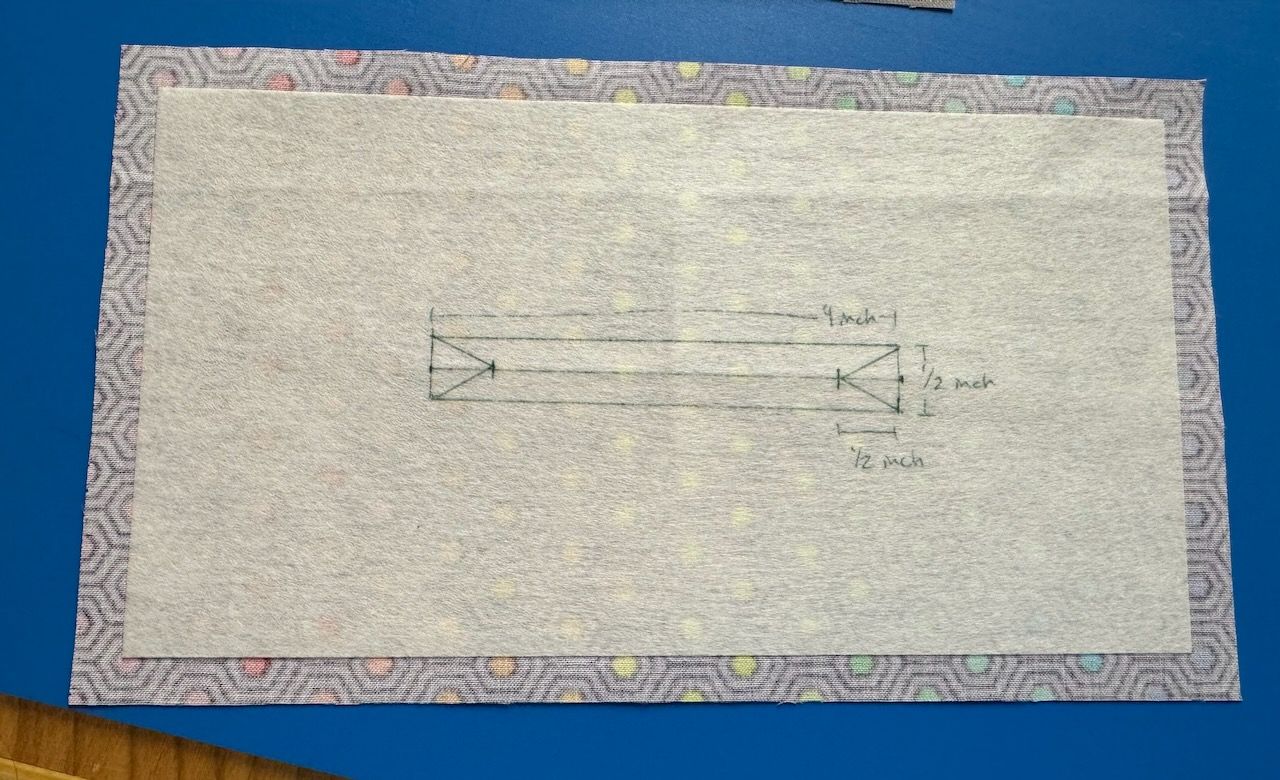
From the center point, mark a rectangle 4” L × 0.5” W from that is centered on the top piece. It should be 2” out left and right and 0.25” up and down from the center point.
Mark the area as shown in the photo below.
Place the two top fabrics right side together and pin in place then sew along the perimeter of the outlined rectangle.
Using scissors, cut through the interfacing/ 2 top fabrics as shown in the photo below being careful not to cut the perimeter seam.
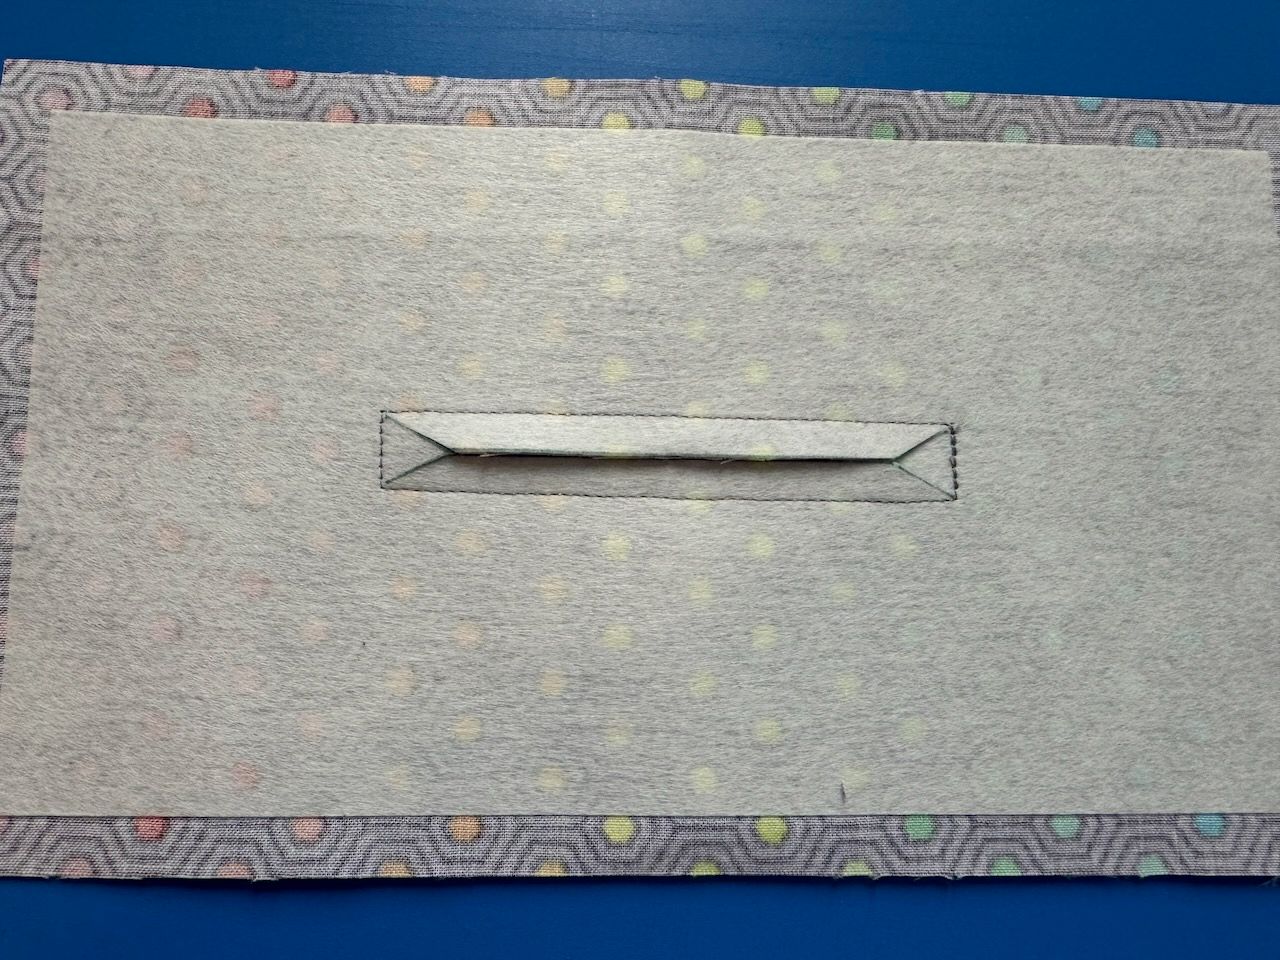
Pull the non-interfaced fabric through the cut opening so that the two top fabrics are wrong sides together. Note that this will take some manipulation of the fabrics and ironing to get the interfacing side flat with a nice rectangular opening. Top stitch around the rectangular opening.
Next, sew a 0.25” seam around the edge to hold the top pieces in place.
Take fabric B (sides) and hem it on one of the long edges so that the final height is the height of your tissue box plus 0.25” (H + 0.25”).
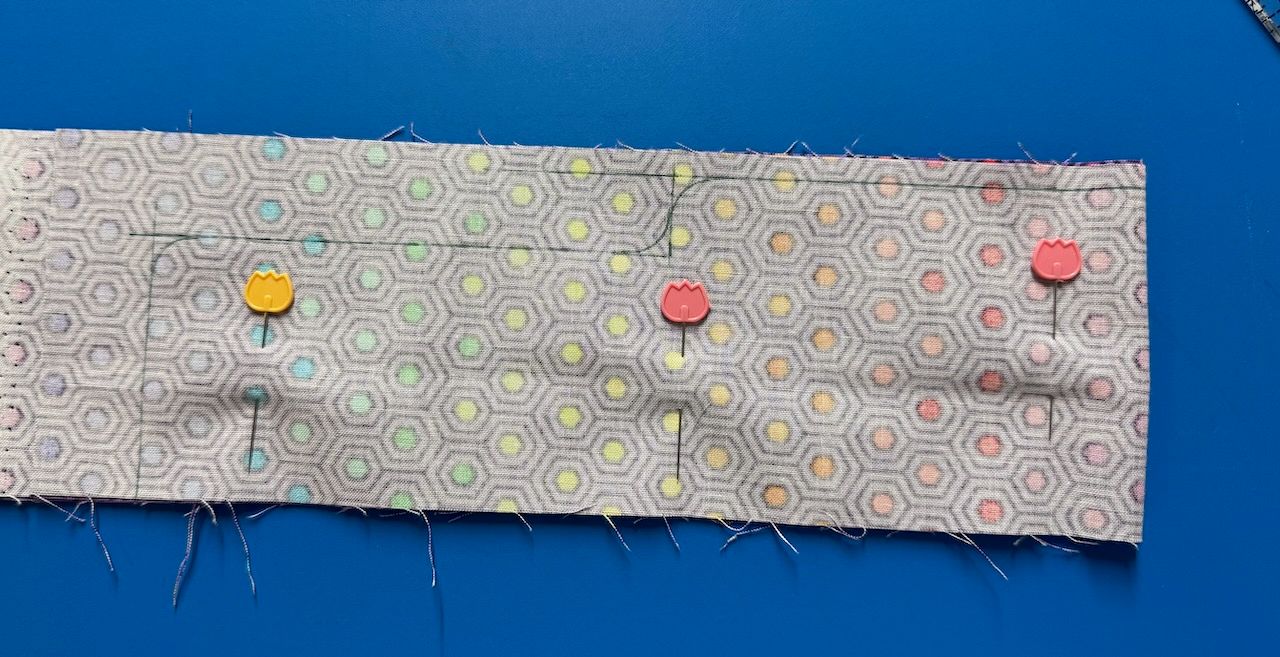
Take your back/cushions pieces (C) and place them right sides together. Fold the pieces lengthwise in half and pin in place. On the fabric mark 0.75” from the long edge and (W + 0.25”) from the short, unfolded edge. Use a nickel to round out the edges. See picture below (Note: in my picture the fabric was oversized). Cut out the small rectangle with curved corners.
Unfold the fabric pieces and pin them together right sides together. Sew along the edges using a 0.25” seam leaving an opening at the top. Leave the bottom edge unsewn. Once sewn snip the rounded corners to reduce puckering and turn the piece right sides out. Iron your piece.
COUCH ASSEMBLY
Mark the top couch piece (A) at each corner with 0.25” marks from each edge.
Take your fabric C (back/cushion piece) and pin it to the top piece raw edges together. At each corner snip your C fabric 0.25” before the edge so it can go around the corner smoothly.
Using a 0.25” seam sew piece C to A.
Take your C/A piece and pin Fabric B right sides together with raw edges together. It is recommended that you start from the back so that the final seam is in the back.
At each corner snip your B fabric 0.25” before the edge so it can go around the corner smoothly. Using a 0.25” seam sew piece B to C/A. Start approximately 0.5” from the fabric edge and sew around until you reach the seam. There should be an approximate 1” overlap of fabric on the “inside” of the couch. The overlapped fabric should be sewn down the inside to make a seam. Turn the fabrics right sides out and test the fit on your tissue box.
Add polyfill through the opening of the back/cushion piece. Once you’ve stuffed it to your liking hand sew the opening closed.
Throw Pillows
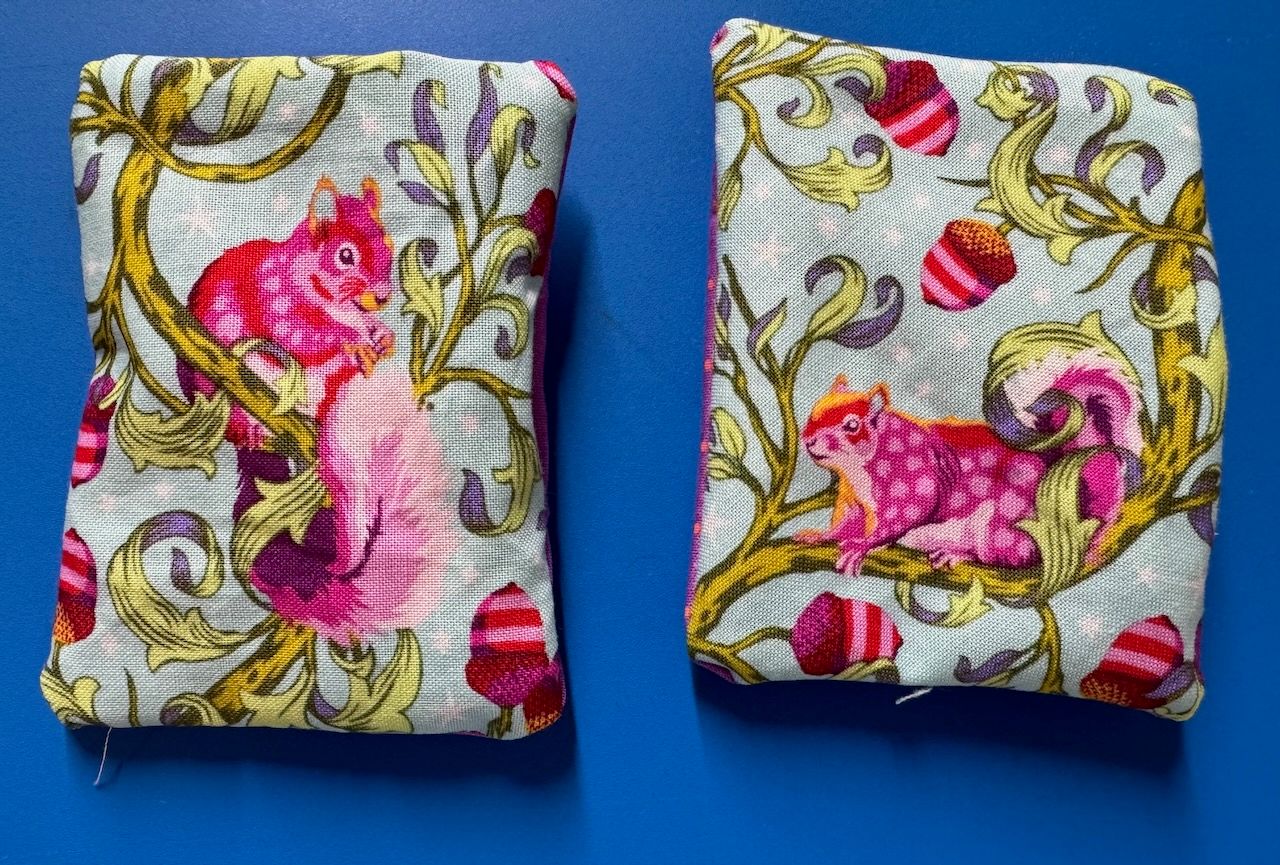
To spruce up my couch I used some small scraps to make throw pillows. They were no particular size, just small rectangles sewn right sides together leaving an opening.
I turned them right sides out and filled with polyfill then sewed the opening closed.
In order to hold the throw pillows in place I used a few hidden stay stitches to hold the pillows to the couch. (Note: I ended up trimming the right pillow shorter).
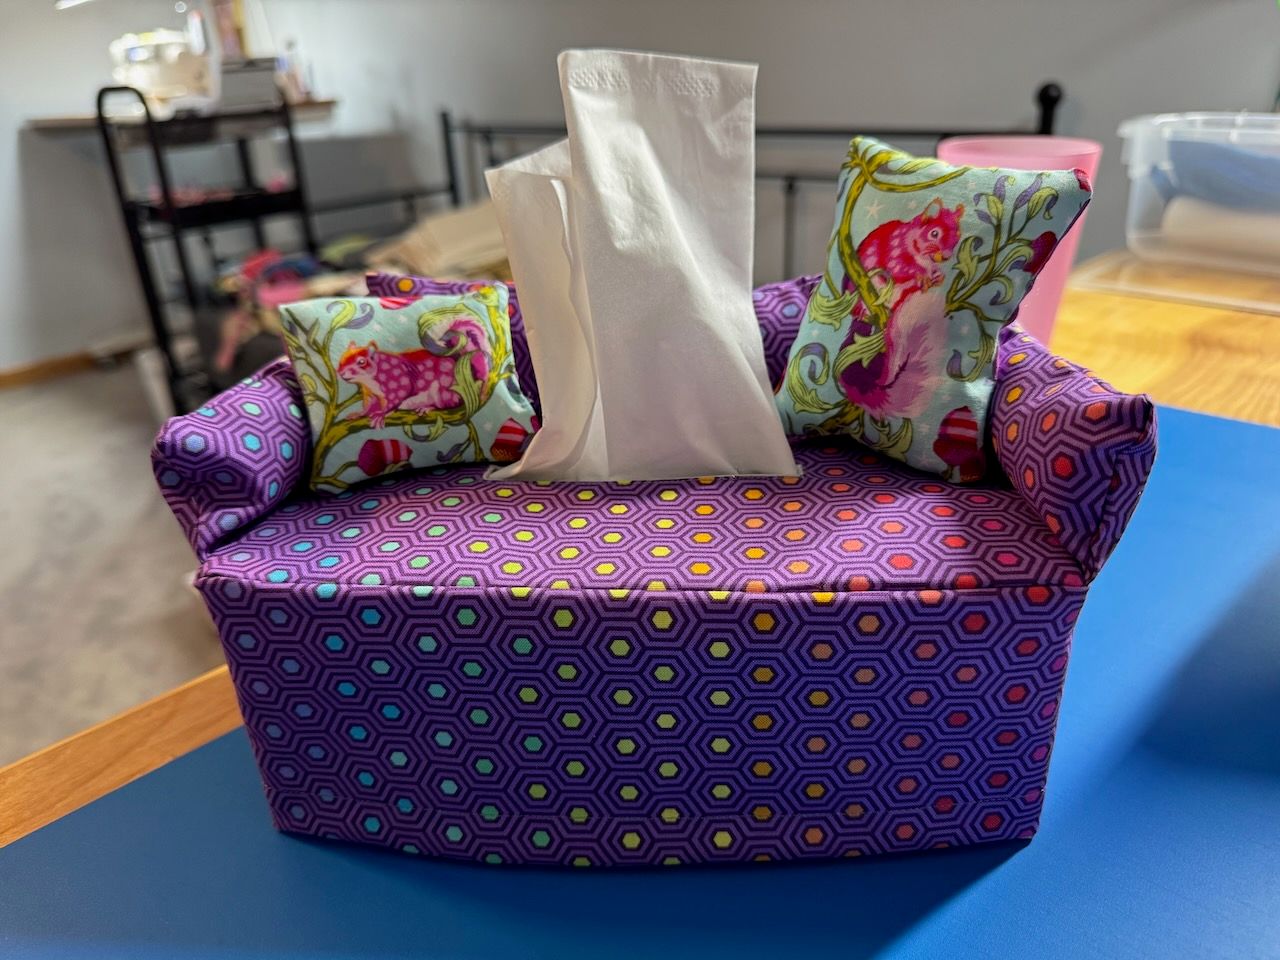
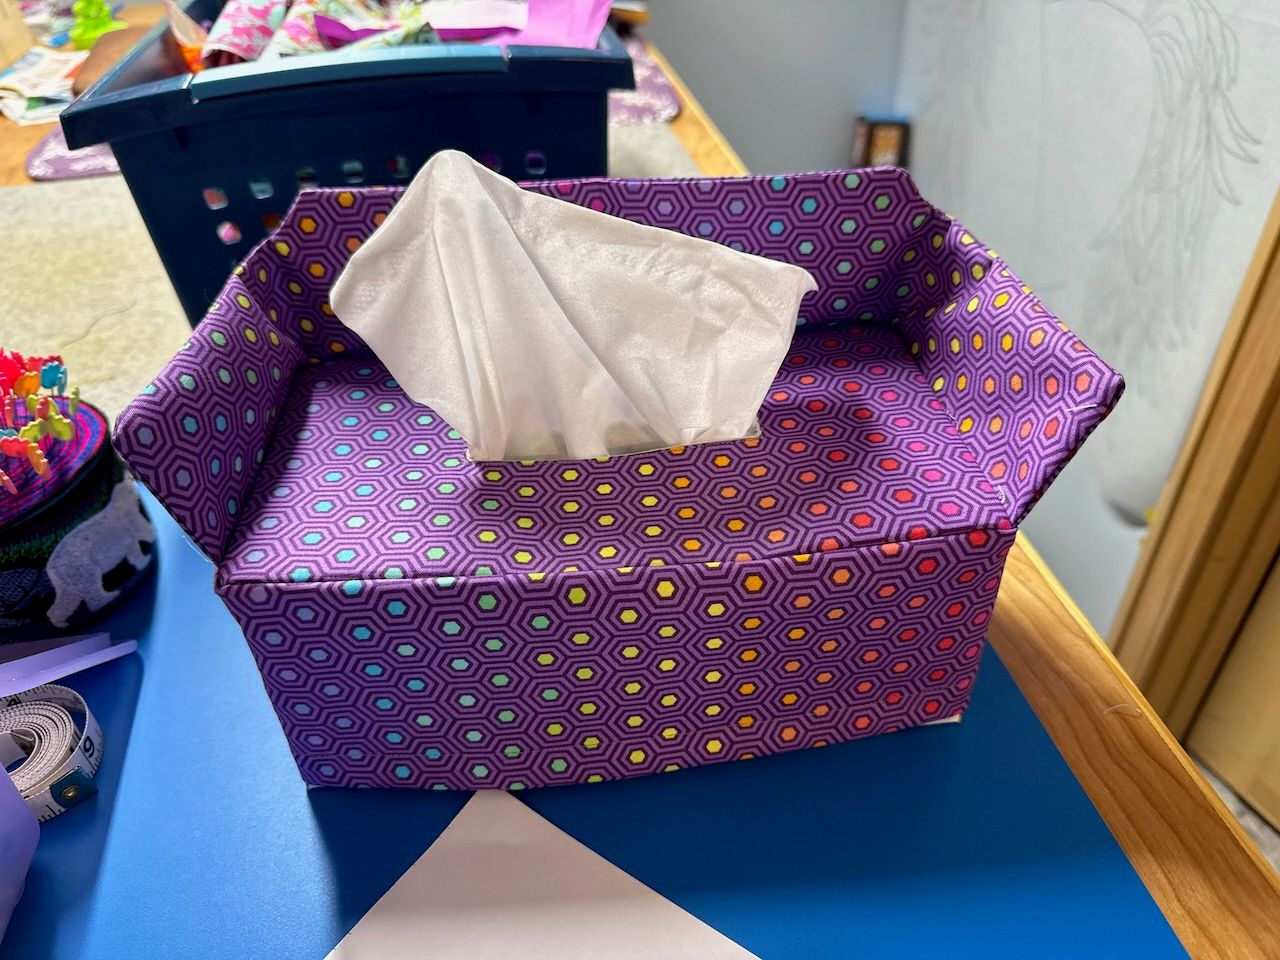
Finished Couch
And here’s the final product! I love how it turned out. It was a fun project and a great way to use up some fabric scraps and I hope you found these instructions helpful.